Maintaining your hot tub’s optimal performance is not always about blissful bubble baths under the stars. Sometimes, it involves a bit of hands-on maintenance like emptying and refilling your tub effectively. Wondering how to go about this process without causing any damage or functional issues to your prized possession? We have got you covered! This step-by-step guide ensures a smooth draining and refilling experience and guarantees longevity for your hot tub. Read on as we dive into the nitty-gritty of emptying and replenishing your hot tub, so you can keep enjoying those soothing hydrotherapy sessions with peace of mind.
The proper way to empty a hot tub involves locating the drain valve, connecting a garden hose, and allowing the water to drain. It is recommended to also flush the plumbing lines before draining and choose a safe drainage location that will not damage vegetation or infrastructure. Additionally, it is important to clean the interior shell thoroughly after draining and to refill the hot tub properly to avoid airlocks in the plumbing system. For more detailed instructions and best practices, consult your hot tub’s owner manual or speak with a professional.
Preparations for Emptying Your Hot Tub
Before you begin the process of emptying your hot tub, it’s essential to make a few preparations to ensure a smooth and hassle-free experience. Taking the time to gather the necessary tools and materials will save you time and frustration later on.
The first step is to gather a garden hose that is long enough to reach from your hot tub to a suitable drainage location. Make sure the hose is in good condition and free from any kinks or blockages that could impede water flow. It’s also helpful to have a submersible pump on hand if you prefer a faster draining process, although this is optional.
Next, locate and turn off the power supply to your hot tub. This step is crucial for safety purposes and to prevent any accidental damage during the draining process. Refer to your hot tub’s manual or consult with a professional if you’re unsure about how to shut off the power properly.
It’s also important to consider where you will be draining the water from your hot tub. Choose a suitable location that can handle the volume of water being drained without causing damage or creating erosion problems. Avoid areas near delicate vegetation or areas prone to flooding.
For example, John, who lives in an urban apartment, decides he wants to empty his hot tub onto his patio, unaware that the excessive water volume could damage both his property and neighbouring units. By planning ahead and identifying alternative drainage locations like a nearby floor drain or connecting the hose to his building’s common drainage system, he avoids potential conflicts and costly repairs.
Finally, ensure you have enough time set aside for the entire process. Draining a hot tub can take several hours depending on factors such as its size and drainage method. By allotting sufficient time, you can complete the task without feeling rushed or cutting corners.
Now that you are prepared with all the necessary tools and have made the required considerations, it’s time to move on to shutting off the pump and heater.
- Before draining your hot tub, it’s important to gather the necessary tools and materials, turn off the power supply, choose a suitable drainage location, and allocate enough time for the process.
- Failure to do so can result in safety hazards, property damage, or other costly repairs. Planning ahead can help ensure a smooth and hassle-free experience.
Shutting Off the Pump and Heater
To begin emptying your hot tub, you need to shut off the pump and heater. This step is crucial as it prevents any further circulation of water within the spa and reduces the risk of damage or injury during the draining process.
Start by locating the control panel or power switch for your hot tub’s pump and heater. This is typically located near the tub or in a designated control panel area. Consult your hot tub’s manual if you’re unsure about its specific location.
Let’s say Sarah wants to empty her hot tub to perform maintenance. She finds the control panel near her hot tub and encounters several buttons and switches. After referring to her hot tub’s manual, she identifies the appropriate switches for shutting off both the pump and heater. Taking a moment to understand the controls ensures she doesn’t accidentally shut down any other vital systems.
Once you have identified the correct switches, turn them off in sequence. Start with the pump and make sure it comes to a complete stop before moving on to shutting off the heater. This sequential approach ensures a proper shutdown of both components, reducing any potential issues when restarting them later.
After shutting off the pump and heater, it’s wise to double-check that they are indeed powered down by confirming that there is no vibration or noise coming from these systems. Additionally, turning off these components conserves energy during the draining process.
With your hot tub’s pump and heater safely shut down, you are now ready to proceed with disconnecting valves and hoses to continue emptying your hot tub.
Disconnecting Valves and Hoses
Before you embark on the task of draining your hot tub, it’s crucial to ensure that the valves and hoses are properly disconnected. This step will allow for a smooth drainage process and prevent any mishaps or damage to the equipment.
First, locate the drain valve of your hot tub. This is typically located at the bottom of the tub and may be concealed by a cap or cover. Remove the cap to access the valve.
Next, identify the type of drain valve your hot tub has. It could be a simple spigot-style valve or a more complex multi-turn valve. Understanding the type of valve will help you navigate the disconnection process more effectively.
If you have a spigot-style valve, connect a garden hose to the drain fitting on the valve. Ensure that it is securely fastened to prevent any leaks or spills during drainage. For multi-turn valves, carefully follow the manufacturer’s instructions on how to disconnect and attach a hose if necessary.
Imagine you’re getting ready to drain your hot tub after a long winter season of little use. You locate the drain valve under some debris and remove the cap, revealing a spigot-style valve. You connect your trusty garden hose ensuring it is tightly attached to avoid any water wastage once drained.
Ensuring all valves and hoses are properly disconnected plays a vital role in avoiding potential leaks or unwanted water remnants during and after draining.

Draining Your Hot Tub
Now that you’ve successfully disconnected the valves and hoses, it’s time to proceed with draining your hot tub. The method you choose will depend on personal preference and available equipment – either using a garden hose or a submersible pump.
Using a Garden Hose
If you opt for using a garden hose, make sure that one end is securely attached to the drain fitting on your hot tub’s drain valve. Run the hose to a suitable drainage location, ensuring that it is positioned in a way that allows for smooth water flow.
Once everything is set up, it’s time to open the drain valve and allow the water to start flowing out of your hot tub. Keep in mind that draining a hot tub through the drain valve can take some time – often up to 2 hours, depending on the size of your tub and water pressure.
Draining a hot tub with a garden hose is quite similar to patiently waiting for a pot of water to boil on the stove. It may take some time, but the end result will be worth it.
Using a Submersible Pump
Alternatively, if you have a submersible pump, this method offers a more efficient and quicker way to drain your hot tub. Begin by turning off the power supply to your hot tub as an added safety measure.
Connect one end of the drainage hose to the pump and place the pump into your hot tub. Run the other end of the hose to a suitable drainage location, ensuring that it is positioned properly for efficient water flow.
With all connections secure, turn on the submersible pump and let it do its job. You’ll be amazed at how quickly it drains the water from your hot tub – usually just a matter of minutes.
Picture yourself using a submersible pump after hosting a fun-filled gathering with friends in your backyard. With little time on hand before dinner preparations, you quickly turn off the power, connect the pump and drainage hose, and position it towards an appropriate drainage area nearby. Within minutes, your hot tub is elegantly emptied and ready for maintenance.
Regardless of the method you choose, always keep an eye on the draining process to ensure everything is working smoothly and efficiently. Once your hot tub is completely drained, you’re ready to move on to the next steps of cleaning and maintenance.
Using a Garden Hose or Submersible Pump
When it comes to emptying and refilling your hot tub, you have two main options: using a garden hose or a submersible pump. Let’s take a closer look at both methods.
Using a garden hose is the more traditional approach, and many hot tub owners prefer it for its simplicity. To begin, turn off the power to your hot tub and locate the drain valve. This valve is typically found near the bottom of the hot tub. Remove the valve cap and attach one end of your garden hose to the drain valve.
Next, run the other end of the garden hose to a suitable drainage location. It’s crucial to choose an area that won’t damage vegetation or create erosion problems. Once everything is in place, open the drain valve and allow the water to flow out through the hose. Keep in mind that draining a hot tub using this method can take up to two hours, depending on its size and the water pressure.
Imagine you’re preparing to drain your hot tub using a garden hose on a sunny afternoon. The process begins as you gather your tools and follow each step meticulously. As you open the drain valve, you feel a sense of satisfaction seeing the water gushing out into the grassy area beside your patio. You take this moment to appreciate your hard work in maintaining your hot tub and how it’ll soon be sparkling clean.
On the other hand, if time is of the essence or you simply prefer a quicker method, using a submersible pump might be more suitable for you. Similar to draining with a garden hose, start by turning off the power to your hot tub before proceeding. Connect one end of the submersible pump to a drainage hose and lower it into your hot tub, ensuring that it is fully submerged.
Run the other end of the drainage hose to an appropriate drainage area. Once everything is set up, turn on the submersible pump and let it do its work. Unlike using a garden hose, draining your hot tub with a submersible pump can be completed in just a few minutes!
Now that we’ve covered how to empty your hot tub using either a garden hose or a submersible pump, let’s shift our focus to cleaning and maintenance, which are equally important aspects of keeping your hot tub in optimal condition.
Cleaning and Maintenance
Regular cleaning and maintenance are crucial for keeping your hot tub clean, hygienic, and running smoothly. Let’s explore the essential steps involved in this process.
After the hot tub is drained, it’s time to clean the interior shell. Start by using a soft, damp rag or sponge along with a spa shell cleaner specifically designed for hot tub use. Avoid using abrasive cleaners or household cleaning products as they can potentially damage the surface of the shell.
Thoroughly scrub the entire interior shell, paying close attention to any areas with built-up grime or residue. Remember to rinse off the cleaner thoroughly after cleaning to ensure no residue lingers behind.
Imagine yourself inside the empty hot tub, armed with a sponge and spa shell cleaner. You meticulously go over every inch of the interior shell, gently but firmly removing any dirt or stains. As you work, you appreciate the dedication required for proper hot tub maintenance and how it contributes to providing you with an enjoyable soaking experience.
Apart from cleaning the interior shell, cleaning the spa filters is another essential maintenance step. Begin by locating the philtre compartment cover and remove it according to your hot tub model’s instructions. Take out each philtre and give them a thorough cleaning.
Soak the philtres in a degreaser or philtre cleaner solution for the recommended duration mentioned in the product instructions. Afterward, rinse them thoroughly using a garden hose to remove any remaining debris. Once clean, ensure the philtres are properly placed back into the philtre compartment and securely reinstall the cover.
Having completed the cleaning and maintenance steps, we can now shift our attention to refilling the hot tub and some tips to ensure a smooth process.
- According to the Association of Pool and Spa Professionals, up to 80% of public hot tubs may fail health inspections due to improper draining and cleaning. This stresses the importance of proper maintenance.
- Hot Springs Spas suggests that with average usage, a hot tub should be drained and refilled every three to four months.
- The Environmental Protection Agency (EPA) warns that untreated hot tub water can contain high levels of bacteria or chemicals harmful to plants, so it’s crucial to drain the water in an appropriate place.
Vacuuming the Hot Tub and Cleaning Philtres
As a hot tub owner, it’s essential to keep your spa clean and well-maintained for optimal enjoyment and performance. One crucial step in this process is vacuuming the hot tub and cleaning the filters. Over time, debris, dirt, and other contaminants can accumulate in the tub, affecting water quality and potentially damaging the equipment. Regularly vacuuming and cleaning the philtres is key to keeping your hot tub in top condition. Let’s dive into the details of how to perform this important task.
Before starting the cleaning process, it’s crucial to understand that different hot tub models may have varying philtre placements and vacuuming mechanisms. Therefore, I highly recommend consulting your specific hot tub manual for detailed instructions tailored to your unit. However, let’s discuss some general steps that apply to most hot tubs.
Step 1: Turn off the power to the hot tub. Safety should always be a priority when dealing with electrical appliances. Locate the disconnect switch or shut off power at the main breaker panel.
Step 2: Remove and inspect the filters. Most hot tubs have one or more cartridge filters that trap debris and particles from circulating water. These filters need regular cleaning to maintain optimal filtration efficiency. Remove the philtre cover or access panel (usually located near the skimmer area) and carefully take out each philtre.
Let’s say you remove the philtre cover, only to find that your philtres are clogged with leaves, hair, and other debris after hosting a weekend pool party. You realise it’s high time to give them a thorough cleaning.
Step 3: Rinse the filters with a garden hose. Start by rinsing off loose debris from the surface of each philtre using a gentle stream of water from a garden hose. Pay special attention to rinse between pleats or folds to dislodge any trapped debris. Make sure the water flows in the opposite direction of the pleats to clean them effectively.
Step 4: Soak the filters in a filter cleaner solution. To deep-clean the filters, prepare a solution of filter cleaner according to the instructions provided. Submerge the philtres completely in this solution for the recommended duration, ensuring all surfaces are covered. This will help break down oils, lotions, and other contaminants that may have accumulated.
Step 5: Rinse the filters thoroughly with clean water. After soaking, remove the filters from the cleaning solution and rinse them thoroughly with clean water to remove any remaining residues or cleaning solution. Ensure all traces of cleaner are eliminated before returning them to the hot tub.
Imagine testing your philtres after thorough rinsing and witnessing pristine white material instead of a dull grey colour. You can’t help but feel satisfaction knowing your filters are ready to keep your hot tub water crystal clear once again.
Step 6: Allow the filters to dry completely. It’s crucial to let the filters dry thoroughly before reinstalling them in your hot tub. Placing wet or damp filters back can lead to mould or bacterial growth over time.
Now that we have covered vacuuming and cleaning the filters, it’s time to move on to another critical step – refilling and restarting your hot tub.

Refilling and Restarting Your Hot Tub
Once you have completed cleaning your hot tub and ensuring that everything is in good condition, it’s time to refill and restart it. Properly refilling your hot tub is essential for maintaining water balance and ensuring optimal performance. Let’s go through the steps involved in this process to get your spa up and running again.
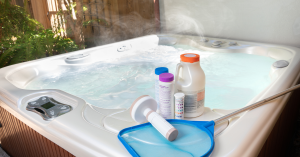
Step 1: Check the water level and add chemicals if necessary. Before starting the refilling process, ensure the water level is at its recommended level. If needed, adjust the water hardness and pH levels using appropriate chemicals according to your hot tub manufacturer’s instructions.
Step 2: Turn on the power. Once you’ve checked the water level and applied any necessary chemicals, it’s time to restore power to your hot tub. Switch on the disconnect switch or reset the breaker at the main panel.
Imagine that sense of anticipation as you hear the hum of your hot tub equipment coming back to life after a thorough cleaning. The excitement builds knowing that relaxation and rejuvenation are just around the corner.
Step 3: Refill your hot tub. Attach the hose to the designated fill pipe or fitting specified in your hot tub’s manual. Make sure you use a safe source of water, such as municipal supply or properly treated well water. Allow the hot tub to fill gradually while monitoring the water level.
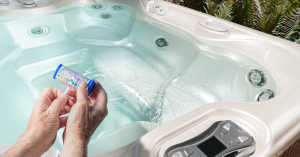
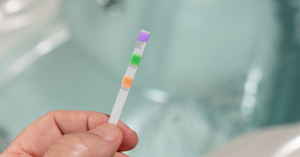
Step 4: Test and balance the water chemistry. After refilling, test the water using appropriate testing strips or kits to ensure it is within acceptable ranges for pH, alkalinity, and sanitization. Adjust these levels if necessary using suitable chemicals as recommended by your spa manufacturer.
Step 5: Allow time for proper filtration and circulation. It’s important to let your filled hot tub run for several hours to allow for proper filtration and circulation of freshly filled and balanced water throughout the system. This will help ensure even distribution of sanitizers and other chemicals.
Step 6: Double-check all settings and functionality. Before taking that much-anticipated dip into your newly filled hot tub, double-check all settings and functionality, including temperature control, jets, lights, and any additional features your spa may have.
With these steps completed diligently, you can now relax knowing that your hot tub is clean, balanced, and ready to provide you with a soothing and invigorating experience.
Filling Procedures and Restoring Power
Now that you have successfully drained and cleaned your hot tub, it’s time to move on to the next crucial step in the process – filling the tub with water and restoring power. This section will guide you through the necessary procedures to ensure a smooth and efficient filling process.
Firstly, make sure that any drain caps or plugs are securely closed before proceeding. This will prevent any water leakage once you start filling the tub. Next, locate the fill pipe as specified in your hot tub’s owner’s manual. It’s important to use the designated fill pipe to avoid any potential airlocks in the plumbing system.
Once you have located the fill pipe, connect a suitable hose to it. Ensure that the hose is clean and free from any contaminants that might affect the water quality. It’s recommended to use a separate hose specifically for filling the hot tub rather than one that has been used for other purposes.
Before turning on the water supply, it’s a good idea to take a moment to inspect the interior of the hot tub shell for any debris or dirt that might have been missed during the cleaning process. Use a soft, damp rag and a spa shell cleaner to gently wipe away any residues. Avoid using household cleaners as they can be harmful to the shell.
Imagine this scenario: You’re standing there, hose in hand, ready to fill your hot tub with fresh water. The sun is shining, and you can almost feel the warm bubbles against your skin already. But wait! Before you turn on that tap and let the water flow, double-check everything one more time. Make sure all drain caps are closed tightly, visually inspecting them for any signs of leaks. Locate that fill pipe like a seasoned detective following clues, ensuring it’s free from obstructions or damage.
With preparations complete, slowly turn on the water supply at a moderate pressure to prevent splashing or overflow. Keep a close eye on the water level as it rises, ensuring that it doesn’t surpass the recommended capacity for your specific hot tub model.
While the hot tub fills, take the opportunity to inspect and clean the filters if you haven’t done so already during the cleaning process. Remove the cover to the philtre compartment and carefully remove each philtre. Soak them in a degreaser solution according to the manufacturer’s instructions. Once soaked, rinse the philtres thoroughly with a garden hose to remove any remaining dirt or cleaning agent residues. Finally, replace the filters properly in their designated slots.
As the tub reaches the desired water level, take a moment to check for any airlocks in the plumbing system. Airlocks occur when air bubbles get trapped, preventing proper circulation and potentially causing damage to the equipment. To release any trapped air, gently open various jets and valves throughout the hot tub until you no longer hear any hissing or sputtering sounds.
With your hot tub now filled and airlock-free, it’s time to restore power and bring your relaxation haven back to life. Locate the power source or control panel for your hot tub and ensure that it is turned off before plugging it back in or switching it on. This step ensures safety during power restoration.
With all necessary precautions taken, go ahead and restore power to your hot tub. If you unplugged it during the draining and cleaning process, simply plug it back into a grounded outlet. For models with a control panel, switch it on according to the manufacturer’s instructions.
Once power is restored, allow your hot tub’s systems to start up and circulate water for a few minutes before testing any additional features or settings. Take this time to ensure that all jets are working correctly and that water is properly heated.
Congratulations! You have successfully completed the filling procedures and restored power to your hot tub. Pat yourself on the back for a job well done as you bask in the anticipation of soaking in your clean, rejuvenated oasis. Now it’s time to relax and enjoy the fruits of your labour.